
When a visitor lands on your website, the layout, design, copy and images all lead them on a path to completing the action you designed your entire site for, whether that’s purchasing a product, filling out a price quote request or sharing content on social media. This action is your ultimate conversion goal, and the frequency at which visitors complete that action is your primary conversion rate.
Every ultimate conversion goal has several steppingstone conversion goals that lead to it; defining this set of goals is the first step in optimizing your conversion rate and getting the results you need from your visitors. From there, it’s time to put on your researcher hat and start planning and conducting experiments, testing different designs, layouts, copy and images until you find a combination that gives you optimal results.
Setting conversion goals
You already know the primary goal of your site: If you’re running an e-commerce business, your ultimate goal is sales; if you’re a freelance graphic artist, your ultimate goal is lead generation or portfolio exposure; and if you’re a blogger or vlogger, your ultimate goal may be sponsorships and ad sales.
Pinpointing the steppingstone goals isn’t always as obvious. Your customer journey map is a fantastic place to start. If you don’t have one, look at the data you have on visitors—from a source like Google Analytics—who have completed your ultimate goal and work backward, pinpointing each touchpoint they had along the way to find places where you can set measurable goals to improve.
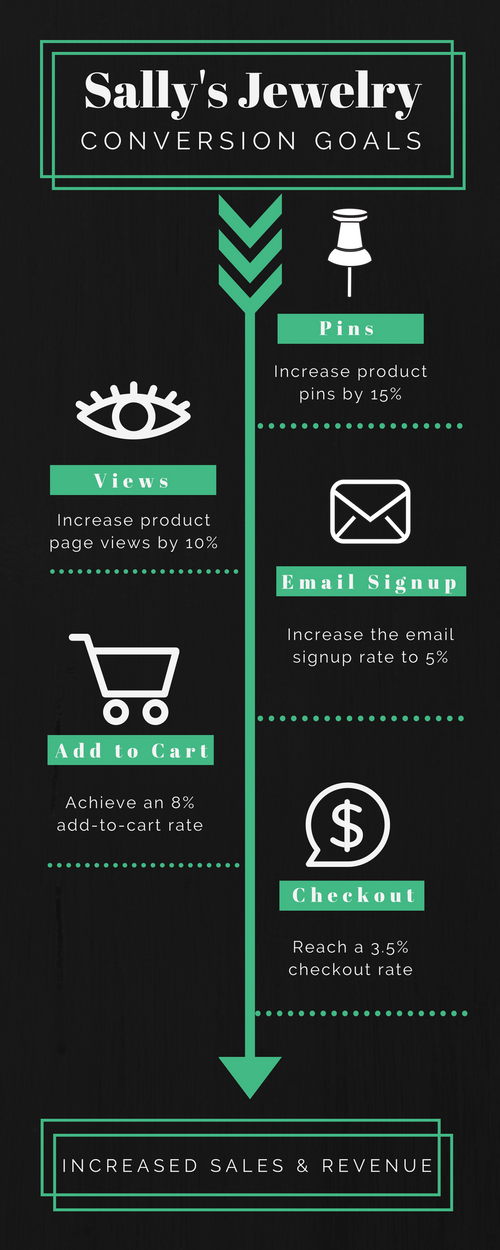
Here’s an example from fictional retailer Sally’s Jewelry, whose ultimate goal is sales and revenue. She knows that, of her current customers, most came over from Pinterest to view a product and followed a specific path over several weeks before finally making a purchase. Based on this, she’s defined a handful of steppingstone goals to work on to increase the conversion rate of her ultimate goal.
Tools and baseline measurements
Before you start testing all of the variables that affect your goals, determine what your current conversion rate is for each goal. For this, and to conduct testing, you’ll need an analytics tool with experiments built in to the platform. Google Optimize, which works with Google Analytics, is the go-to for many businesses, but other fantastic options include VWO and Optimizely X. All three work beautifully for measuring your conversion rates, conducting tests and tracking results.
Google Optimize
VWO
Optimizely X
If you aren’t currently using any analytics tools, get a program set up and track your current site and your listed goals for a few weeks before you move on to testing.
A/B testing and experiments
Well-planned A/B tests are worth their weight in gold. First, you need to decide on the variables you want to test, and then create two different options for each before pitting them against each other.
Defining the variables
Focus on a steppingstone goal first; ideally, a goal that ties in to the start of your customer’s journey so you can fine tune the conversion funnel from the beginning. In the case of Sally, she knows that most of her product views originate from Pinterest, so she’ll start by testing out adding the “Pin It” button overlay to her product images.
Create a list of every variable that could reasonably affect a customer’s decision to take the action that meets your goal. For example, if you’re working on increasing your newsletter subscribers, you may want to test the:
- Placement of the signup field
- Color of the signup field
- Wording of the signup prompt
- Use of pop-up prompts versus on-page prompts
Creating the experiment
Choose one variable to start with and then create two different options for a potential change. For example, if the newsletter sign-up field is currently in the upper right corner of your website’s home page, option A may place the field above the home page image, while option B places it below.
Option A:

Option B:

Google Optimize, Optimizely X and VWO allow you to choose the percentage of traffic you direct to each option, as well as target specific demographics. When you’re just starting out, keep the process simple and stick to a relatively even split between option A and B; as your site traffic grows, start playing around with more complex testing.
The method for setting up the test varies by platform, but the basics are the same across the board:
- Define your goal for each test.
- Use the platform’s visual editor to create two new versions of the site page in question based on the two options you’re testing.
- Set the traffic split and timeline for your test.
Testing should last for a few days to a few weeks. If your site’s traffic is on the lower end, err toward the lengthier side of the spectrum to obtain accurate data. Remember that unaccountable variables play a role in how users interact with a site. If you test for too long, you may end up skewing the data.
Once the first test is complete, keep working on the same steppingstone goal until you optimize the conversion rate as much as possible, working your way through your goals and every variable that affects those goals.
User preferences and behaviors change as frequently as fashion trends, and any change you make could lower the effectiveness of a previous change. To keep your website in tip-top shape you’ll definitely want to track your data, redefine your steppingstone goals and variables, and continue testing on a regular basis. Consistently monitoring and testing your site, and implementing even the smallest changes, results in a clear, defined path that encourages visitors to interact with your online piece of real estate in exactly the way you need them to.
Biz.me is not affiliated with any business, product or influencer discussed or linked to in this post. We just like sharing great content and products. 🙂